

CA-27 #412296
Since 1980
Local team. No pressure. No spam.
Your backyard should be a place you actually want to spend time. Too many Orangevale homes have yards that sit empty because the layout does not work. No shade, no seating, no reason to go outside. Outdoor living space design in Orangevale, CA changes that.
We help homeowners turn wasted yard space into a real outdoor room. Think patios, pergolas, fire pits, and dining areas that fit your lot and your lifestyle.
This page walks you through the full process. You will see what to expect from the first call to the finished space.
A professional who designs outdoor living spaces is called a landscape designer or landscape architect. In Orangevale, many work under a licensed landscaping company. Some hold certifications from national landscape design programs.
Start by checking credentials before you schedule your first yard visit.
Your yard is telling you something. You just have to know what to look for. Most backyards we see in Orangevale share the same problems. The space exists, but nobody uses it. That gap between having a yard and loving your yard comes down to design.
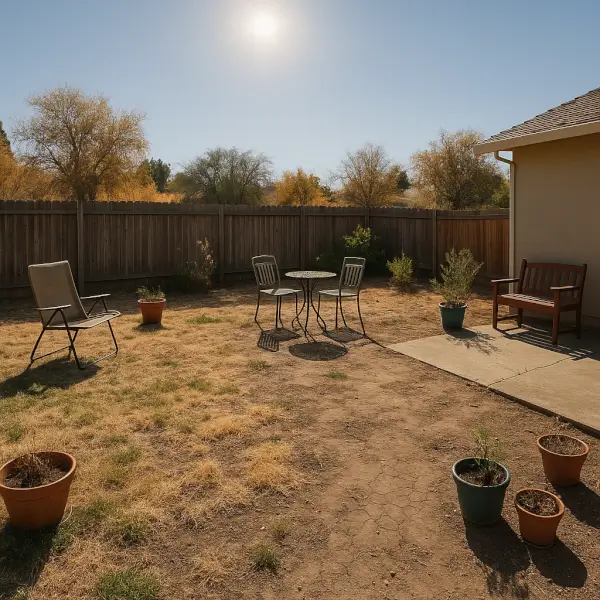
An uneven yard with no clear purpose is one of the biggest red flags. If you walk outside and do not know where to sit, eat, or relax, the layout needs work. A flat patch of grass with no zones or flow is not a living space. It is just a lot.
Dead grass patches or bare dirt areas tell you the space is fighting against itself. Poor drainage, too much shade in one spot, or too much sun in another creates dead zones. These trouble spots will not fix themselves with more water or seed. They need a design that works with your yard’s conditions.
No shade or seating makes your backyard almost useless during Orangevale summers. Temperatures push past 100 degrees from June through September. Without a pergola, shade sail, or covered patio, your yard sits empty for four months every year. That is a third of the year you lose.
Scattered furniture and random plantings mean the space grew without a plan. A chair here, a pot there, and a grill shoved into the corner do not make an outdoor room. They make a storage area. A clear layout gives every piece a purpose and every plant a role.
A cramped or cluttered patio signals that the original design does not match how your family lives now. Kids grow, gatherings change, and a small slab of concrete stops working. If you bump elbows at dinner or drag chairs onto the grass for extra room, the patio is too small.
Recognizing these signs is the first step. The second step is talking to a designer who knows Orangevale lots and can plan around the heat.
Picking the wrong designer costs you time, money, and a backyard you still do not use. Picking the right one gives you a space that fits your family and your lot. The good news is that a few simple checks separate a great designer from an average one.
Orangevale has a mix of older ranch homes and newer builds. Yard sizes and soil conditions vary a lot from one street to the next. A designer with local experience handles a tight 6,000 square foot lot differently than a half-acre property. That flexibility matters. According to university research on sustainable infrastructure, outdoor spaces designed around real usage patterns last longer and deliver more value. The same idea applies right here in your Orangevale backyard. Hire someone who knows this area and builds around how you actually live.
A little prep work before your first meeting makes the whole project run smoother. Designers move faster when you show up with clear ideas and useful details about your yard. You do not need to be an expert. You just need to do a few simple things ahead of time.
Write down how you want to use your space. Think about the activities that matter most to your family. Do you want a dining area for weekend dinners? A fire pit zone for cool fall evenings? A play area for kids? A quiet reading corner with shade? Get specific. A designer who knows your priorities will build around them instead of guessing.
Take photos of your yard from every angle. Walk the full perimeter and snap pictures from each corner. Get close-ups of problem spots like bare dirt, cracked concrete, or pooling water. Shoot at different times of day so you capture where the sun hits and where shade falls. These photos give your designer a head start before the site visit.
Note any trees, slopes, or drainage issues. In the Village at Orangevale neighborhood, many lots have mature oak trees that must be designed around carefully. Large root systems limit where you can place a patio or run irrigation lines. Slopes change how water moves across your yard after a storm. Write down anything that stands out so nothing gets missed.
Gather photos of outdoor spaces you like. Browse Pinterest, Instagram, or magazine sites and save images that match your taste. You do not need to explain why you like them. Your designer will spot patterns in the colors, materials, and layouts you are drawn to. Five to ten saved images give a clear picture of your style.
Clear a path for the designer to walk your full yard. Move stored items, toys, or equipment away from fences and side yards. Your designer needs to measure every section and check grade changes along the property line. A blocked walkway slows down the visit and can hide important details.
These small steps save hours during the design phase. They also help you feel confident that your project starts with the right information on the table.
Once you pick a designer and finish your prep work, the project follows a step-by-step process. Each phase builds on the one before it. Knowing what comes next keeps you in control and removes surprises along the way. Most Orangevale projects take four to twelve weeks from first meeting to finished outdoor space.
Step one is the site visit. Your designer comes to your property and measures every section of the yard. They note grade changes, existing trees, fence lines, utility access points, and sun exposure. They also look at how your home connects to the outdoor area. Door placement, window sightlines, and roof overhangs all shape the final layout. This visit usually takes one to two hours depending on lot size.
Step two is the concept drawing. Your designer takes the measurements and your wishlist and builds a layout on paper or screen. This drawing shows where the patio sits, where the pergola goes, where plants fill in, and how people move through the space. It is not final. It is a starting point that puts your ideas into a visual form you can react to.
Step three is the revision meeting. You sit down with your designer and walk through the concept together. This is where you say what you love and what needs to change. You might shift the fire pit closer to the house or swap a built-in bench for movable chairs. Good designers expect revisions. One or two rounds of changes are normal on any project.
Step four is the final design package. After revisions, your designer locks in the plan. This package includes a detailed layout, a full materials list, a plant schedule with species and spacing, and a cost breakdown. You approve this package before any work begins. Nothing gets built until you sign off on every detail.
Step five is the build phase. Your landscaping crew follows the approved plan and brings the design to life. Hardscape goes in first. Then grading and drainage. Then planting and irrigation. Lighting and finishing touches come last. Your designer checks progress at key points to make sure the build matches the plan.
This process works because each step has a clear finish line. You always know where the project stands and what happens next.
Your project is wrapping up and the space looks great. But before you sign off, take time to inspect every detail. A careful walkthrough catches small issues while the crew is still on site. Fixing a missed irrigation line or a crooked paver takes minutes now. It takes weeks if you wait until after the crew leaves.
Walk the entire space with your designer and hold the original layout drawing in your hand. Compare what you see in front of you to what the plan shows. Check that the fire pit sits where it was drawn. Confirm the pergola lines up with the sightline from your back door. Count the seating zones and match them to the approved design. If something moved during the build, ask why. Sometimes field conditions force small shifts, but your designer should explain every change.
Test all lighting, water features, and electrical outlets before you call the project done. Flip every switch. Turn on every fountain or bubbler. Plug a phone charger into each outdoor outlet. Do this during the day and again after dark. Landscape lighting looks different at night, and you want to confirm that path lights, accent lights, and string light connections all work as planned.
Inspect hardscape edges closely. Run your hand along paver borders, stone cap edges, and concrete seams. Surfaces should feel level under your feet. Joints should be consistent. Mortar lines should be clean and straight. Tap stones lightly to check for hollow spots that signal a weak base underneath.
Ask your designer for a written care schedule before they leave. New plants in Orangevale need specific watering amounts during the first summer. A care schedule tells you what to water, how often, and when to cut back. In Orangevale’s dry summers, confirm that irrigation lines reach every new planting zone before the crew leaves. Turn on each drip zone and watch for dry spots. A single missing emitter can kill a new plant in a week when temperatures hit triple digits.
This walkthrough protects the money and time you invested. It also gives your designer a chance to fix anything that fell short of the plan.
You spent real money and real time building your outdoor living space. Now the goal is to keep it looking and working like it did on day one. The good news is that maintenance does not take much effort. A few small habits spread across the year protect your investment for a long time.
Trim plants every season. Shrubs and ornamental grasses grow fast in Orangevale’s warm climate. One missed season and branches start crowding walkways, blocking path lights, or pushing into seating areas. A quick trim in spring, summer, and fall keeps growth in check. Cut back perennials hard in late winter so fresh growth fills in before your first outdoor dinner of the year.
Seal wood decks and pergolas every one to two years. Sun, rain, and temperature swings break down wood finishes faster than most people expect. A quality penetrating sealer blocks UV damage and moisture absorption. Cedar and redwood hold up well in our climate, but they still need protection. Check for soft spots or splintering each time you seal. Catching rot early saves you from replacing full boards later.
Flush drip irrigation lines each spring. Mineral buildup and small debris clog emitters over the winter months. Open the end caps on each line and run water through for a few minutes. Then check every emitter by hand. A blocked emitter starves one plant while the rest of the zone stays green. You will not notice the problem until the plant browns out in July, and by then it is too late.
Pull weeds from hardscape cracks early. A tiny weed sprout in a paver joint looks harmless. But roots grow fast and push joints apart. Over a full season, shifted pavers create trip hazards and collect standing water. Pull weeds when they are small. Spray joints with a pre-emergent herbicide twice a year to slow regrowth. This five-minute habit saves you from a full paver reset down the road.
Book a yearly check-up with your Orangevale landscaper. A trained eye catches things you walk past every day. Settling pavers, leaning posts, fading sealant, and struggling plants all show up during a professional walkthrough. One visit per year keeps small fixes small. Skipping it lets minor issues turn into expensive repairs.
In the Sundance neighborhood of Orangevale, clay-heavy soil creates a specific challenge. Clay expands when wet and shrinks when dry. That seasonal movement pushes pavers out of alignment during winter rains. If your property sits on clay, keep drainage channels clear and make sure water flows away from hardscape edges. A clogged French drain or a blocked channel lets water pool under your patio base. By spring, you will see lips and gaps between stones that were level six months ago. Staying on top of drainage is the single best thing you can do on clay-heavy lots.
These habits take a few hours spread across the whole year. That small time investment keeps your outdoor space looking sharp and working right season after season.
Outdoor living space design costs in Orangevale vary based on project scope and materials. A basic design package with a patio and simple planting plan may start around $3,000 to $5,000, while a full outdoor room with a kitchen, pergola, fire pit, and irrigation can range from $15,000 to $60,000 or more. Lot conditions like slopes or clay soil also affect pricing. Request a detailed quote after your site visit so the estimate reflects your specific yard and goals.
The best time of year to start an outdoor living project in Orangevale is typically late fall through early spring. Cooler temperatures make construction more efficient, and new plants establish stronger root systems before summer heat arrives. Starting in October or November often means your space is ready by spring. However, design work and planning can begin any month. Booking your initial consultation early gives your designer enough lead time to create a thorough plan before the build phase starts.
You can absolutely design an outdoor living space on a small Orangevale lot. Many homes in the area sit on lots around 6,000 square feet, and a skilled designer knows how to maximize every inch. Multi-use zones, built-in seating, vertical plantings, and compact fire features all work well in tighter spaces. The key is choosing a designer experienced with smaller properties who can create defined areas for dining, relaxing, and entertaining without making the yard feel cramped or cluttered.
Whether you need a permit for an outdoor living space project in Orangevale depends on the scope of work. Simple patio installations and planting may not require one, but structures like pergolas, outdoor kitchens with gas lines, electrical work, and retaining walls typically do. Sacramento County oversees building permits for the Orangevale area. A licensed landscape contractor will know which permits apply and can handle the filing process for you, keeping your project compliant from start to finish.
Serving: Orangevale, Fair Oaks, Folsom, Roseville, Rocklin, Granite Bay, Citrus Heights, Rancho Cordova, Elk Grove, Auburn, Lincoln, Fairfield, El Dorado Hills, and Beyond