

CA-27 #412296
Since 1980
Local team. No pressure. No spam.
Orangevale homeowners deal with hot, dry summers and sudden heavy rain. Without a rain sensor, your sprinklers run no matter what the sky is doing. That wastes water and drives up your bill every month.
Rain sensor integration in Orangevale, CA gives your irrigation system the ability to pause on its own when it rains. The sensor talks directly to your sprinkler controller and shuts things down until conditions dry out.
This page covers how the process works, what types of sensors fit your yard, and what to expect on installation day. A local landscaper can get your sensor set up fast and keep your yard protected all year.
Yes, Orangevale’s hot summers and mild winters affect sensor choice. Wired sensors work well in open spots with no shade. Wireless sensors fit yards with trees or structures that block a direct wire path.
Talk to your landscaper about which sensor fits your property before scheduling installation.
You might think you need a brand new controller to add a rain sensor. In most cases, that is not true. Many sprinkler controllers sold in the last 20 years already have a sensor terminal built right into the wiring panel. That means your system may be ready to go with very little extra work.
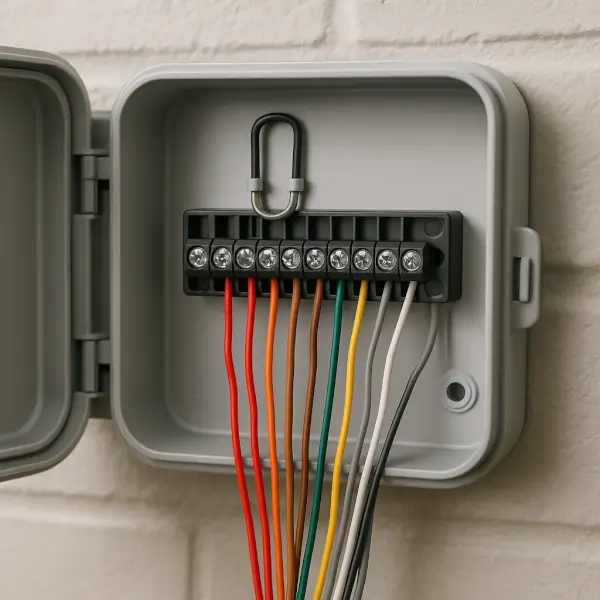
A technician starts by checking your controller model before anyone buys a single part. This step matters because not every sensor fits every controller. The tech opens your controller box, looks at the terminal strip, and confirms whether a dedicated sensor input exists. If it does, the job gets simpler and cheaper for you.
Older systems sometimes have a bypass jumper wire sitting across the sensor terminals. That small wire tells the controller to ignore any sensor input. Removing it takes about 30 seconds and opens the door for your new rain sensor to communicate with the system. If your controller has no sensor terminal at all, the tech will recommend an affordable adapter or relay that bridges the gap.
Mounting location matters just as much as wiring. The tech walks your property to find a clear, open spot near the roofline or along a fence line. The sensor needs direct exposure to rainfall without overhanging branches or eaves blocking it. A bad mounting spot leads to missed rain events and wasted water.
Many Orangevale homes built in the 1990s already have compatible controllers. Diagnosing your setup first saves you time and keeps you from spending money on the wrong sensor type. According to research from the University of California, landscape irrigation accounts for roughly 60 percent of annual residential water consumption in inland suburban communities like Orangevale — making an accurate system diagnosis one of the highest-return steps a homeowner can take.. Getting the diagnosis right up front puts you in the best position to cut waste and lower your bill from day one.
Choosing between a wired and wireless rain sensor comes down to your yard, your budget, and your property layout. Both types do the same job. They tell your controller to stop watering when it rains. But how they connect and where they mount changes based on your situation.
Wireless sensors are popular in Orangevale’s newer developments where long wire runs are not practical. Your tech will recommend the best fit after seeing your yard in person.
A little preparation on your end makes the whole process faster and easier. Most rain sensor installations take one to two hours on a standard Orangevale yard. That includes mounting the sensor, wiring it to your controller, and running a full system test. Knowing what happens before the tech shows up helps you feel ready and keeps the job on schedule.
Clear the area around your controller box before the tech arrives. Move bikes, storage bins, or anything blocking access. The tech needs room to open the panel, check the wiring, and connect the sensor leads. If your controller is in the garage, make sure there is a clear path from the door to the box. A few minutes of cleanup saves real time once work begins.
Know your controller brand and model ahead of your appointment. You can usually find this on a label inside the controller door or on the front panel. Text a photo of it to your landscaper before the visit. This lets the tech bring the right sensor and any adapters your system needs. It also cuts down on return trips for parts.
You do not need a city permit for this work. Orangevale does not require a permit for rain sensor add-ons to residential irrigation systems. There is no inspection to schedule and no paperwork to file. Your tech handles everything in a single visit.
Before the tech leaves your property, they run a full test of the entire sprinkler system. Every zone gets checked. The sensor gets triggered to confirm it pauses the controller. You watch the process and ask any questions right there on the spot. The tech does not pack up until everything works the way it should.
The actual installation follows a clear sequence that takes about an hour on most Orangevale properties. Each step builds on the one before it. Here is what your tech does from start to finish.
Step one is finding the right mounting spot. The sensor needs a location that catches rain directly with no overhangs, tree canopy, or walls blocking it. Roofline edges and tall fence posts work well. In the Hazel Avenue corridor of Orangevale, techs often mount sensors on south-facing eaves for the best rain exposure. That orientation also keeps the sensor in open air where it dries properly between storms.
Step two is running the wires or pairing the wireless receiver. For a wired sensor, the tech routes two thin wires from the mounting spot down to your controller box. These wires connect to the dedicated sensor terminals on your controller’s wiring strip. The tech strips each wire end, wraps it around the terminal screw, and tightens it down. For a wireless unit, the tech plugs a small receiver module into those same terminals instead.
Step three is removing the bypass jumper. Many controllers ship with a small wire or tab connecting the two sensor terminals. That jumper tells the system to ignore any sensor input. The tech pulls it out so the rain sensor can communicate with the controller. Skipping this step would leave the sensor connected but useless.
Step four is setting the rain threshold. Most sensors have an adjustable dial or switch that controls how much rain triggers a shutoff. Your tech sets this to match Orangevale’s typical rain events. A quarter inch is a common starting point for our area. You can adjust it later based on your watering needs and soil type.
Step five is running a live test cycle. The tech starts a manual watering cycle on one zone and then simulates rain at the sensor. The sprinklers should stop within seconds. If they do, the sensor is wired correctly and the threshold is responding. If they do not, the tech troubleshoots the connection on the spot. You see the whole process happen in real time before the tech moves on.
You deserve proof that your new rain sensor actually works before the tech drives away. That is why every installation ends with a full round of testing. No guesswork. No hoping it works the next time it rains. You see the sensor do its job right in front of you on your own property.
The first test is simple. The tech starts a manual spray cycle on your controller and lets one zone run water. Then the tech applies a wet sponge directly to the sensor discs. This simulates rainfall without waiting for actual clouds to roll in. Within seconds, the moisture-absorbing discs expand and send a signal to your controller. The sprinklers stop. You watch it happen in real time standing right next to your system. If the zone does not shut off, the tech checks every wire connection and terminal setting until it does.
The second test matters just as much. The tech needs to confirm your zones resume watering after the sensor dries out. Orangevale’s afternoon heat means sensors dry out fast during the warmer months. A sensor that shuts off your system but never lets it restart would leave your lawn dry for days. The tech waits for the discs to release or manually resets them, then verifies the controller picks up its normal schedule again. This resume cycle gets checked on at least two zones before the tech signs off.
Before the tech leaves, you get a full walkthrough of normal sensor behavior. You will know exactly what to look for on your controller when it rains this winter. You will also know what it looks like when the sensor dries out and your system goes back to its regular watering schedule. That confidence means you are not calling anyone in a panic the first time your sprinklers skip a cycle. You already know the sensor is doing its job.
Your rain sensor is a small device, but it needs a little attention each year to keep doing its job. Skipping basic care leads to missed rain events and wasted water. The good news is that maintenance takes about 15 minutes and costs almost nothing. A sensor that gets annual care lasts five to ten years before it needs replacing.
Clean the hygroscopic discs once a year. These are the small stacked discs that absorb moisture and trigger the shutoff signal. Dust, pollen, bird droppings, and leaf bits build up on them over time. A dirty disc swells slower and may not respond to light rain at all. Pop the disc stack out of the sensor housing, rinse each disc with a garden hose, and let them air dry before snapping them back in. Oak tree debris in older Orangevale neighborhoods is a common problem. If you live near mature oaks, clean your discs in the fall after leaves drop. That extra cleaning prevents buildup from sitting on the sensor all winter.
Check the sensor mount after winter storms. Wind and rain can loosen screws and crack plastic housings over the wet months. Give the mount a firm wiggle with your hand. If it shifts or wobbles, tighten the screws or replace the bracket. A sensor that tilts out of position catches less rain and performs poorly.
Replace the battery in wireless sensors every one to two years. Most wireless units use a standard coin cell battery. When the battery gets low, the sensor stops sending signals to your controller. Your sprinklers then run during rain with no shutoff. Swap the battery at the start of each year and you avoid that problem entirely.
Schedule a spring checkup before Orangevale’s dry season begins in May. A tech can inspect the mount, clean the discs, test the shutoff, and verify your controller settings in a single short visit. This catches small problems before they turn into wasted water during the hottest months. By the time June and July heat arrives, your sensor is already tuned and ready to respond the moment rain returns in the fall.
The cost to have a rain sensor installed in Orangevale depends on whether you choose a wired or wireless unit and whether your controller needs an adapter. Wired sensors generally run less in parts, while wireless models add a small premium for convenience. Most installations take one to two hours. Your technician will check your existing controller first and give you a clear quote before any work begins, so there are no surprises on installation day.
You can absolutely book a rain sensor installation even if you do not know your sprinkler controller model. Your technician will identify the model during the initial inspection before starting any work. However, texting a photo of the controller label to your landscaper ahead of the visit helps speed things up. This way the tech can bring the correct sensor and any adapters on the first trip, reducing the chance of a return visit for additional parts.
A professional rain sensor installation appointment typically takes one to two hours on a standard Orangevale property. The time includes inspecting your controller, mounting the sensor in an optimal spot, running wires or pairing a wireless receiver, and completing a full system test. Larger properties or controllers that need adapters may add a little extra time. Your technician handles everything in a single visit so you do not need to schedule follow-up appointments.
Hiring a landscaper to install a rain sensor in Orangevale is the safer and more reliable choice. A trained technician checks your controller compatibility, selects the correct sensor type for your yard layout, and tests the entire system before leaving. DIY installations risk incorrect wiring, poor mounting placement, or choosing a sensor that does not match your controller. A professional also sets the rain threshold based on local weather patterns so your system responds accurately from day one.
Serving: Orangevale, Fair Oaks, Folsom, Roseville, Rocklin, Granite Bay, Citrus Heights, Rancho Cordova, Elk Grove, Auburn, Lincoln, Fairfield, El Dorado Hills, and Beyond